NOTE: This post will be regularly updated to reflect feedback, research and more resources.
Last Updated: 23 March 2020 by Mapgoose
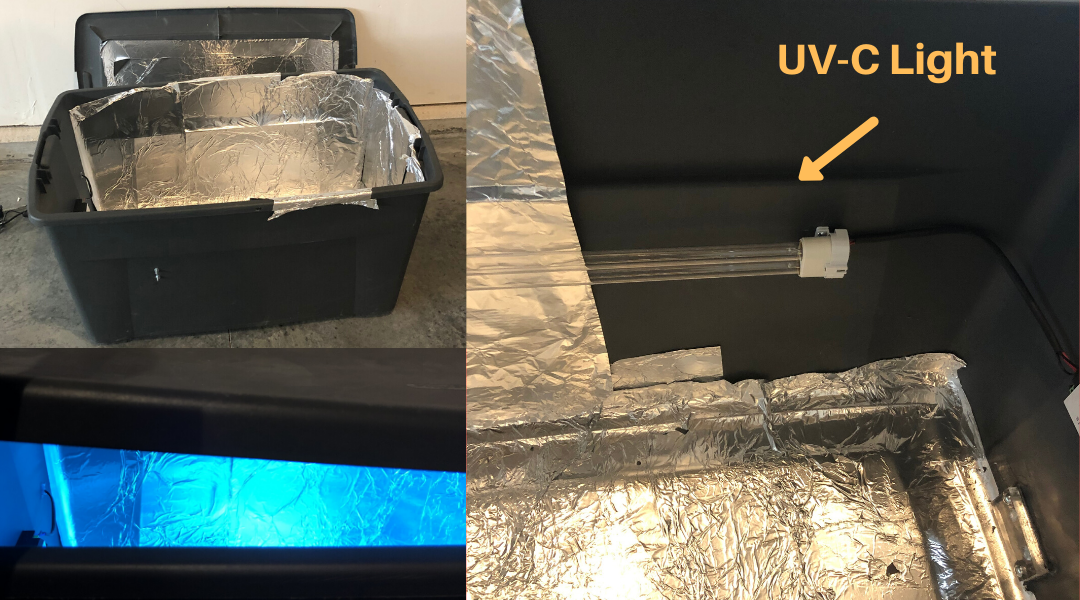
I built a DIY UV-C Sterilizing Box to kill Coronavirus on our Packages, Shoes, Phones and more.
I have a family of 4, and was worried that our mail, amazon packages, shoes, phones, keys, and clothing could unsuspectingly bring COVID-19 into our home.
I couldn’t find anything to buy that was big enough to fit an amazon package into, so I built our own UV light sterilizing box.
The whole thing cost about $115.18.
Caveat & Disclaimer: I am not a medical professional. If you found some holes in my research that will help us all, please do share, as I am trying to find the perfect solution to protect my family. Build at your own risk. I make no representations of the quality or safety of this build. This is not a commercial product and you assume all risk if building this project. Ensure you have adequate ventilation, fire protection, and eye protection.
How we use our Coronavirus Sanitizer Box
We keep this box in our garage, and use it to help sanitize items that are a risk of bringing in Coronavirus to our home. Namely:
- Amazon Packages – Coronavirus can live up to 24 hrs on cardboard. Realize that some boxes are too big to put in here, but it should handle 85% of the packages.
- Mail – We use this to clean any mail that comes through the Post Office
- Shoes – We think that shoes are a big risk and have the ability to carry a lot of bad juju on them, so we sanitize them once a day
- Phones – Although UV-C light “can” damage plastic, it only becomes noticeable after about 100 hrs of exposure, so putting phones in our box for 30 min a day, once a day, seems like it is a reasonable action to take.
- Keys – Car keys are often touched and could be contaminated, thus we throw these in with our phones.
How our UV-C Sanitizer Box Destroys Coronavirus
It uses the UV-C wavelength light to kill Coronavirus (must be UV-C and NOT UV-A or UV-B, according to my research). UV-C in range of 250-280nm is the sweet spot. (nanometer wavelength).
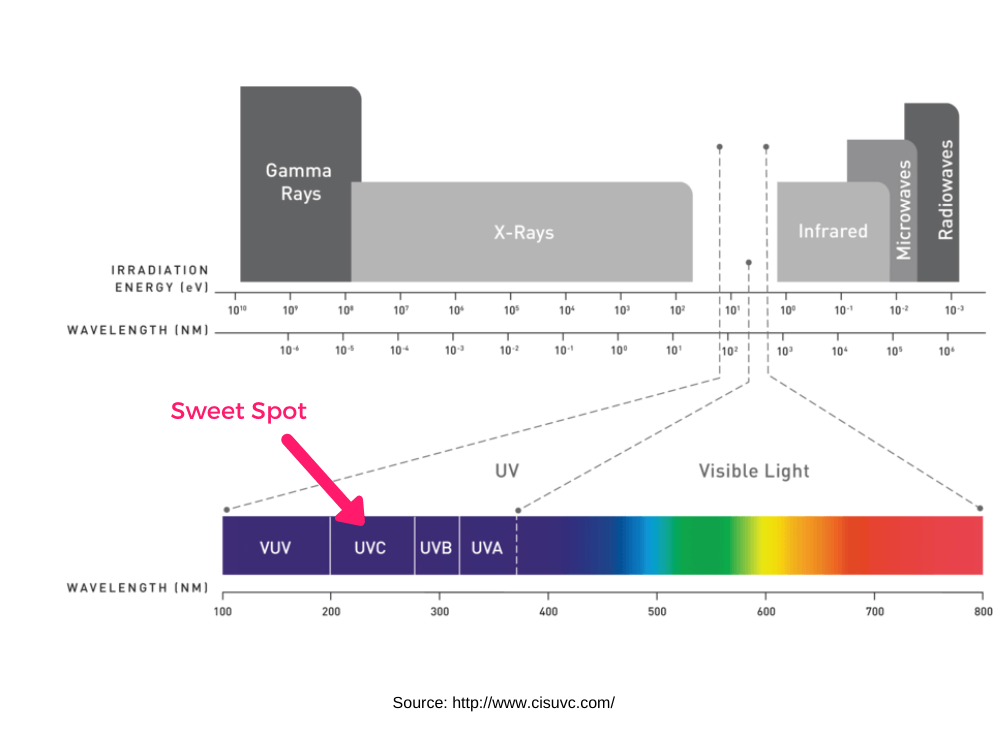
According to cisuvc.com: UVC refers to ultraviolet light with wavelengths between 200 – 280 nanometers (nm). Light in the UVC wavelength can be used for disinfecting water, sterilizing surfaces, destroying harmful micro-organisms in food products and in air.
Can UV-C Kill the Coronavirus?
This is a very good question. I can’t say that I have a 100% answer, but based on my research, I’m confident that this is the case, as long as you have two things:
- Expose it with the correct “strength” or “power” of UV-C
- Expose it for the minimum recommendation duration (time) under UV-C.
“The novel coronavirus is a kind of positive-sense single-stranded RNV virus, same as the SARS and MERS virus. Researches on SARS found that this kind of virus is sensitive to heat radiation and UVC light and can be diminished when exposure to UVC irradiation stronger than 90 μW/cm2. Thus, in theory, UV light would be able to destroy the novel coronavirus (2019-nCov).”
Source
According to the same website:
The effect of UV germicidal irradiation depends on the temperature and humidity of the environment. The suggested time for UV light exposure is at least 30 minutes but it will take longer time to achieve the same effect when it is below 20 degree or over 40 degree Celsius and relative humidity exceed 60%.
Source
Additional Research Regarding the Efficacy of UV-C on Viruses
- UV-C Robots are being used to kill Coronavirus in hospitals: https://www.bbc.com/news/business-51914722
- https://aem.asm.org/content/78/6/1666.short
- https://www.sciencedirect.com/science/article/abs/pii/S0043135416308697
- https://www.ncbi.nlm.nih.gov/pmc/articles/PMC1854994/
- https://bmcinfectdis.biomedcentral.com/articles/10.1186/s12879-020-4847-9
How Powerful of a UV-C Light Do I need?
As previously stated, the recommended power is UVC irradiation stronger than 90 μW/cm2.
In order to achieve the 90 μW/cm requirement, I selected a 36W, 120V, UV-C light to achieve 120µW/cm².
It appears that the higher wattage of 36W will achieve the required power to get above the 90 μW/cm2 threshold.
What Wavelength of UV-C light do I need?
Remember, UV-C in range of 250-280nm is the sweet spot. (nanometer wavelength).
So I looked specifically for a UV-C lights, and found that “Germicidal” UV-C lights were commonly in the 254nm (nanometer) wavelenght, which meets the requirements.
I ended up with a 36W, 120V, 254nm (nanometer wavelength) light – which will achieve 120µW/cm².
Safety Considerations
UV-C light is dangerous to your skin and eyes.
Also, Ozone is produced when the light is operating, so you need to ensure ventilation (I wouldn’t keep this operating inside my house…mine is in my garage).
Per Rexim.com, who I bought the light from, here are their safety precautions:
- We recommend all suitable precaution to avoid eyes or skin exposure to UV radiation. It can produce serious damage to the eye, which may lead to temporary or permanent vision impairment. For this reason, the light produced by a germicidal lamp must be carefully shielded against both direct viewing and reflections and dispersed light that might be viewed.
- Do not look straight to the light. Use protective eyewear during operation.
- • Take also all suitable requirements recommended by the government safety code to avoid explosion to UV radiation or a prolong inhalation of Ozone generated by lamp.
- Use appropriate protection, wires and insulated materials to avoid surge voltage from the lamp leads.
- Discard the lamps in accordance with safety cod requirements for materials containing Mercury.
This means that the box needs to be 100% enclosed to prevent exposing your eyes or skin to the harmful rays.
Our Sanitation Box Safety Features
I wanted to make sure that I was safe operating the box, but also that my kids wouldn’t inadvertently open the box, so I built in a couple features.
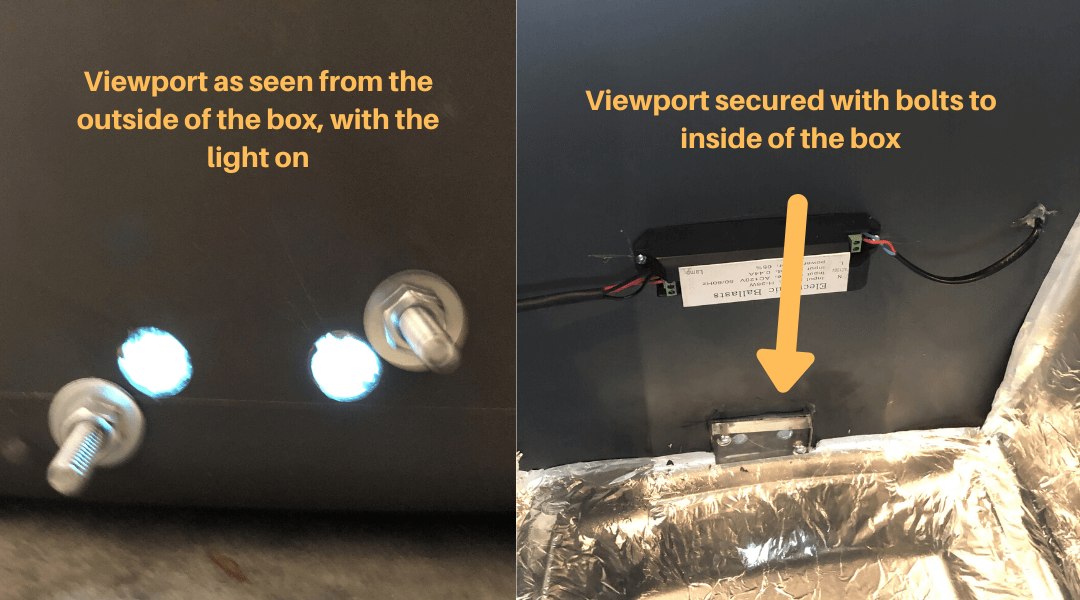
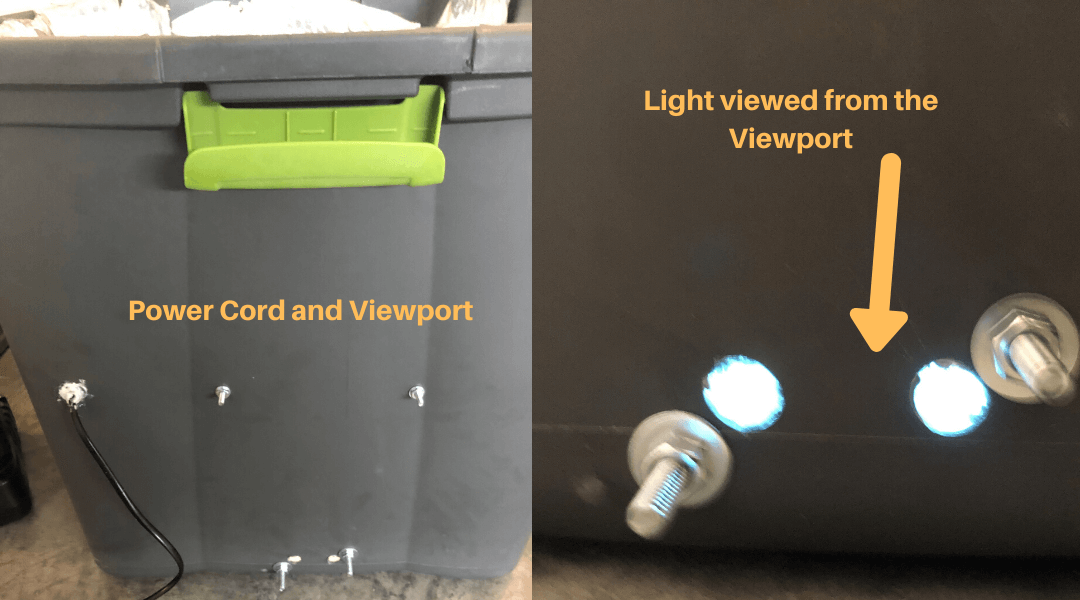
UV-C Box Viewport
The biggest problem I saw with having a 100% enclosed box is knowing if the light was working, burnt out, or the power wasn’t working. This is hard to do without opening it and looking at the light!
So…
I built a viewport into the side of the box using Plexi-Glass (Acrylic Glass).
Why Acrylic Plastic
I found out that acrylic plastic will effectively block UV-C light from passing through it.
The ability of UV-C light to penetrate materials will depend on the chemical composition of the materials. Most acrylic plastics will allow light of wavelength greater than 375 nm to pass through the material, but they will not allow UV-C wavelengths (100–290 nm) to pass through. Even very thin acrylic sheets of less than 5 millimeters (mm) do not let UV-C light penetrate.
Source
Since UV-C wavelength of my light is 254nm, that means that using at least 5mm thick acrylic plastic will block the harmful rays and allow me to check and make sure the light is working.
I went a bit overboard…and used 1/2 inch thick plexi-glass that I found on Amazon
Padlock
I drilled a whole for a padlock to place on the lid, so that I was the only one able to open the box. This will help prevent someone from opening the box while it is operating.
How to Build Your Own UV-C Sanitizer Box
The idea for this box was taken from information on other boxes I found on Reddit. I adjusted the design to best fit our needs. You can increase or decrease the size of the box, just realize that the bigger the box, the more power you need (wattage).
Material List
- The Light Kit and Power Supply:
- Cost ~ $60.98
- Plastic Tote:
- Found one lying around the house. Any one you find should do the trick as long as it seals
- Bolts and Nuts Set
- Used this to fasten the light kit and the viewport to the plastic Tote.
- Bolts, Nuts, and Washer Assortment Kit, 108 Piece
- Cost ~$8.99
- Plexi-Glass
- Used this for the viewport
- SimbaLux Acrylic Sheet Clear Cast Plexiglass 12” x 12” Square Panel 1/2” Thick (13mm)
- Cost ~ $21.95
- Aluminum Foil Wrap:
- This will ensure that the light is reflected around the box to hit all the surfaces of whatever you put in there
- Reynolds Wrap Aluminum Foil (200 Square Foot Roll)
- Cost ~ $9.49
- Adhesive Spray
- I used this to adhere the tinfoil to the sides.
- Be careful, and use it sparingly. It is flammable so need to make sure that your box does not become a fire hazard
- 3M General Purpose 45 Spray Adhesive
- Cost ~ $5.77
- Padlock
- Used this to lock the lid of the box and ensure no one opened it while the light was on
- Cost ~ $8.00
- Caulk
- Make sure you use a non-clear caulk to seal any holes made, such as the hole for the power cord
Construction Steps
It was a very basic, rudimentary, and ugly process :). Speed and functionality were more important to me than making it beautiful. Here were the steps I took.
- Use the adhesive to line the plastic tote with tinfoil
- Allow adequate drying time
- Drill holes to attach the light kit to the Plastic Tote
- Attach the light kit to the Tote using the bolts and nuts
- Can either attach the light kit to the lid or the side of the plastic tote
- Drill holes for the view port
- Cut the Plexi-Glass with hacksaw or other saw
- Drill holes to attach the Plexi-Glass to the tote
- Attach the view port using the bolts and nuts
- Seal any exposed holes with caulk
- Drill hole in the tote for the padlock
- Install the light bulb
- Check operation of the light kit
Total construction time:
For me, with kids “helping” at times, it took me about 2 hours. Your mileage my vary.
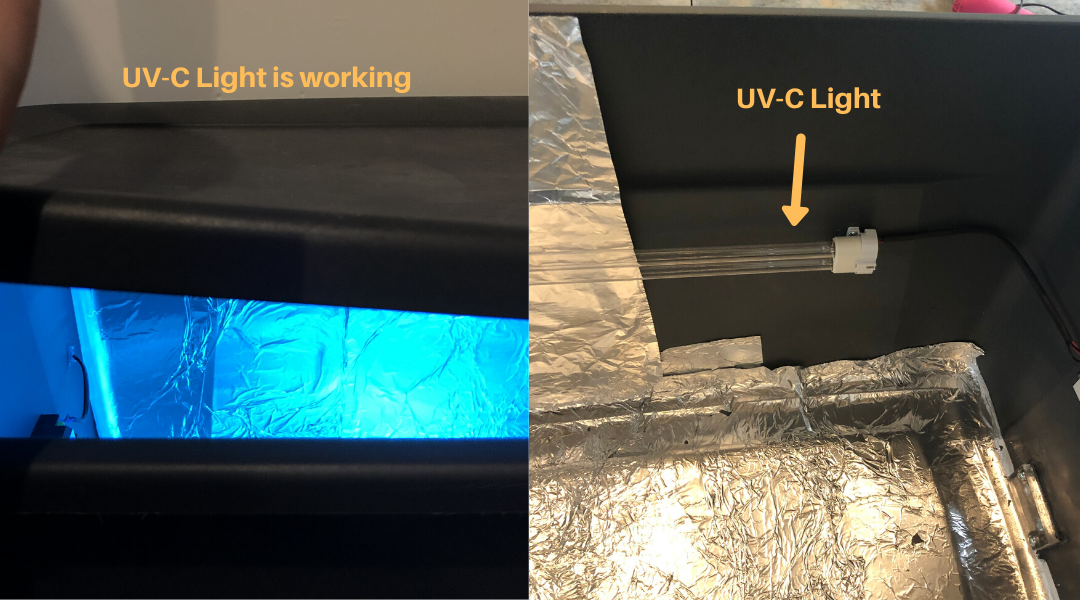
UV-C Light is working. *I opened up the box so that you could see what it looks like inside:
I hope this provides useful to those looking to build the same. If you have feedback how I could make this better or correct any errors, please message me on Reddit here
*this probably contains typos. I did not have time to properly proofread before posting 🙂
Stay safe out there and wash your hands!